Ever wanted to mint a digital asset that you can twirl around in 3D and even drop into augmented reality? 😃 Welcome to the world of .GBL minters, where we create NFTs that aren’t just flat images, but fully interactive 3D models! In this fun and upbeat guide, we’ll walk through how to make your own .GBL minter – essentially, how to mint NFTs with a .GBL 3D model file. By the end, you’ll be able to create and launch a 3D NFT that can wow viewers on platforms like OpenSea, Spatial, or even in VR worlds. Ready? Let’s dive into this minting adventure!
*(Quick note: “.GBL” here refers to a 3D model file (essentially the same as a GLB glTF file) used in NFTs. Don’t confuse it with the old .GBL PCB design files for circuit boards – we’re dealing with something way cooler!)
What Exactly Is a .GBL Minter?
A .GBL minter is basically a tool or process to mint 3D NFT assets. Instead of just uploading a 2D image, you’re minting a token that includes a .GBL 3D model. Think of .GBL/.GLB as the “JPEG of 3D” – a widely supported, compact format for three-dimensional models. It supports textures, materials, animations, even rigged avatars, and it’s royalty-free – making it perfect for the decentralized metaverse. In NFT terms, a .GBL minter lets you embed a 3D model into an NFT’s metadata, so owners can view and interact with the model in 360 degrees.
Why is this exciting? Well, imagine showcasing a digital collectible not as a static picture, but as a spinnable, zoomable 3D object. Projects like Eyeverse have pioneered this by delivering a 3D .GBL avatar with every token. On OpenSea and other marketplaces, these NFTs display as interactive models instead of flat images. And with mobile AR, collectors can even drop the 3D model into their real-life environment (e.g., see your 3D creation sitting on your desk via your phone camera)! In short, a .GBL minter brings your NFT to life in new dimensions.
Ready to build one? Below is a step-by-step guide to creating your own .GBL minter. We’ll cover everything from making or finding a 3D model, setting up the NFT metadata, writing or using a smart contract to mint the NFT, and finally launching it to the world. Let’s get our hands dirty and start minting some magic! 🎉
Step-by-Step Guide: Building Your .GBL Minter
1. Design or Obtain Your 3D .GBL Model (Your Digital Masterpiece)
The first ingredient in our minter recipe is the 3D model itself. You can either create one from scratch or source an existing model – just make sure it’s in the .GLB/.GBL format. If you’re artistically inclined, fire up a 3D tool like Blender and craft your object. Blender is free and super powerful for modeling, texturing, and animation. Create your model (anything from a character, gadget, to abstract art), then use Blender’s export to glTF 2.0 to get a .glb file. Remember to keep it efficient: the GLB format shines with low-poly, optimized models. As one guide suggests, try to stay under 5,000 triangles for the model, use 1024×1024 resolution textures (JPG/PNG), and keep the file size under ~20 MB for smooth loading. This ensures your NFT will load quickly and display nicely in marketplaces. If modeling isn’t your forte, no worries! There are plenty of free 3D models available online. Websites like Sketchfab host vast libraries of free-to-use GLB models (from characters to environments) that you can download, as do platforms like Free3D and CGTrader. Pick a model that you love and that fits within size guidelines. Once you have your .GBL file ready, preview it using a GLB viewer (even Windows 3D Viewer or online viewers) to make sure it looks right. In this step, you’re basically preparing the star of your NFT show – so take your time to get a model that’s polished and optimized.
2. Prepare the NFT Metadata (Blueprints for Your NFT)
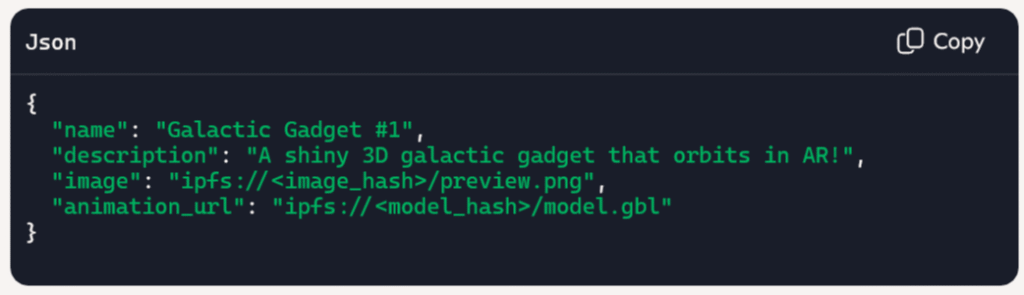
Now that we have a 3D model, we need to create metadata for the NFT that will include this model. NFT metadata is a small JSON file describing your token’s properties – it usually contains a name, description, and links to the asset files (image, video, etc.). In our case, we’ll be linking to the .GBL model. But here’s the trick: large files like 3D models aren’t stored directly on the blockchain (that would be insanely expensive in gas fees). Instead, we store the file on a decentralized storage like IPFS (InterPlanetary File System) and put the URL or content hash in the token’s metadata. So, upload your .GBL file to an IPFS pinning service (for example, NFT.Storage, Pinata, or others). This will give you a link like ipfs://<HASH> or an HTTP gateway URL to the model. Next, create your JSON metadata file. At minimum, include: a name for your NFT, a description telling its story, and an image or preview. Since .GBL is a 3D model, we will use the special animation_url field to point to it. OpenSea and other NFT platforms support GLB models via the animation_url property in metadata.
For example, your JSON might look like: { "name": "Galactic Gadget #1", "description": "A shiny 3D galactic gadget that orbits in AR!", "image": "ipfs://<image_hash>/preview.png", "animation_url": "ipfs://<model_hash>/model.gbl" }
The Eyeverse sample manifest.JSON which you can include a GIF animation with your .GBL
{
  "name":"Eyeverse Truck",
  "description":"https://opensea.io/eyeofunity/",
  "external_link":"https://meteyeverse.com/eyeverse/",
  "attributes":[
    {"trait_type": "colors", "value": 16},
    {"trait_type": "frames", "value": 128}
  ],
  "animation":"ipfs://bafybeibsdcq7d5dnwvyn6mbiefdd4ta2tdaiuunfveepbzkbrby7c44tpa/Eyeverse Truck.glb",
  "animation_url":"ipfs://bafybeibsdcq7d5dnwvyn6mbiefdd4ta2tdaiuunfveepbzkbrby7c44tpa/Eyeverse Truck.glb",
  "image":"ipfs://bafybeidp6yjmrao7fns7whhu3ham3vxutby7vkrnkjxojq3ngvf3zw7l7y/Eyeverse%20Truck.png"
}
Here, image is usually a thumbnail or preview image (a static picture of your 3D model) so that marketplaces have something to display as a preview. animation_url is where you put the link to the .GBL model file – this is what enables the interactive 3D view. Make sure your file links are correct (IPFS hash or URL). Once your metadata JSON is ready, upload that to IPFS as well. You will get a content hash (CID) for the metadata file. This CID is essentially the identifier for your NFT’s metadata and will be used when minting the token on blockchain. At this point, you’ve set up the blueprints of your NFT: the model is stored on IPFS, and the metadata (containing the model link) is also on IPFS. Everything is now ready to be minted!
3, Write a Smart Contract or Use a Template (The Minter’s Brain)
Time to put on your developer hat 👩💻! Minting an NFT requires a smart contract on the blockchain that defines the NFT and executes the mint. The good news is you don’t have to start from scratch – there are standard templates we can use. For NFTs, the popular standards are ERC-721 (for unique one-of-a-kind tokens) and ERC-1155 (for semi-fungible tokens or batches) on Ethereum and compatible chains. These standards ensure your token will be recognized by wallets and marketplaces. We can use a well-tested library like OpenZeppelin to get a base ERC-721 contract that already handles the heavy lifting (ownership tracking, transfer, etc.). Using templates is great for efficiency and security – they’ve been audited by the community, so you avoid reinventing the wheel. In our smart contract (written in Solidity), we’ll set it up so that when we mint a token, it points to our metadata URI. Typically, an ERC-721 contract has a tokenURI function that supplies the metadata URL for each token. We can hardcode a base URI like ipfs:// and then just append our metadata hash, or set the full URI per token. For example, with OpenZeppelin’s ERC721 implementation, you might do something like: set _baseURI() to "ipfs://" in the constructor, then call _safeMint(recipient, tokenId) and _setTokenURI(tokenId, "<metadata CID>") when minting. This effectively ties your token to the IPFS-hosted JSON we created in Step 2. If you’re not comfortable writing Solidity, fear not! There are no-code or low-code solutions for minting NFTs too. For instance, Crossmint offers an API that will mint NFTs and host metadata for you, great for quickly spinning up a collection. Another option is thirdweb or Alchemy’s NFT APIs, which abstract away the contract deployment and let you focus on uploading assets. However, learning to deploy your own contract gives you maximum control (and it’s pretty empowering 🎆). You can choose a network like Ethereum mainnet (for maximum exposure) or a cheaper network like Polygon for low fees and speed. (Polygon is awesome for this – sub-second transactions and practically zero gas fees mean your 3D NFT can be minted without burning a hole in your pocket.) Go ahead and deploy your contract to the network of choice. Congrats – you now have a minting contract live on the blockchain!
4. Mint Your .GBL NFT on the Blockchain (Bringing it to Life)
With the contract deployed, let’s use it to mint the actual NFT token that includes your .GBL. Depending on your contract’s design, you might have a dedicated function to mint (like mintToken(address to, string memory tokenURI)). If you used a template or something like the example above, you’ll call that function and pass in the IPFS metadata link we got from Step 2. You can do this via a Web3 script, a command line, or even a simple frontend dApp interface. For example, using ethers.js or web3.js in JavaScript: call the contract’s mint function with your wallet address and "ipfs://<metadataCID>" as parameters. Once you execute the mint, the transaction will be submitted to the blockchain. After a short wait (a few seconds on Polygon or a bit longer on Ethereum mainnet), you should get confirmation that the token is minted. Voila! 🎉 You’ve just created an NFT that references your 3D model. To double-check, head to OpenSea (or the suitable explorer for the network) and find your new NFT by contract address and token ID. If all went well, OpenSea will fetch the metadata from IPFS and recognize the .GBL model link. The item’s page will show a 3D viewer where users can interact with your model in real-time. How cool is that? On OpenSea, you might see a message like “Interact with item” and be able to rotate/zoom; on some platforms, it might appear under an “animation” or “3D” tab. Make sure the preview image and description are appearing correctly too. Tip: If your 3D model isn’t showing, double-check that you used animation_url in metadata (not just image) and that the file is a supported format (GLB is supported by OpenSea). Also ensure your IPFS links are prefixed properly (ipfs:// or a gateway URL). Once verified, congrats – your .GBL minter has successfully minted its first NFT! It’s alive in the blockchain world for everyone to see.
5. Share, Sell, and Integrate Your 3D NFT (Show Off Your Creation!)
Now comes the most rewarding step: enjoying and sharing your minted 3D NFT. You now hold a token that not only proves ownership of your digital asset, but also lets anyone view it in 3D glory. You can list it for sale on marketplaces or send it to a friend to flex your new skills. Because we adhered to standards, your NFT is compatible with various apps – collectors on OpenSea can view the 3D model in-browser, or even in VR/AR contexts. For instance, some platforms allow an AR view: imagine pointing your phone at a flat surface and dropping your 3D model into your living room via augmented reality – your NFT literally steps into the real world! If you have a VR headset, you could load the model in a metaverse gallery and examine it at true scale. The possibilities are endless: game developers might import your NFT into a game, virtual world enthusiasts could display it in online galleries, etc. Because .GBL (GLB) is such a widely used 3D format, your creation can travel far. Promote your NFT on social media or NFT communities – people love seeing unique, interactive pieces. You might explain the creation process, show a video of the AR view, or highlight any animations it has. If you plan to mint a whole collection, you now have a repeatable process: just swap in new models and metadata and use your contract to mint new tokens (your own 3D NFT collection, yay!). Also, consider marketplaces focused on 3D assets; for example, GLBDEX is an exchange built specifically for 3D model NFTs and it supports GLB files natively. Getting your work on such platforms could attract buyers looking for metaverse-ready assets. Whether you decide to sell your NFT or keep it as a personal trophy, take a moment to appreciate what you’ve built. You’ve gone from a concept to a full-fledged .GBL minter, empowering you to turn 3D models into blockchain tokens at will. The intersection of 3D content and NFTs is an exciting frontier, and you’re now at its cutting edge!
Wrapping Up: Your Journey as a 3D NFT .GBL Minter 😎
Congratulations, tech-savvy creator – you’ve learned how to make a .GBL minter from scratch and minted a 3D NFT step-by-step! What started as an idea is now a reality: you can mint interactive 3D collectibles that live on the blockchain. We went through designing or finding a 3D model, preparing the data on IPFS, using a smart contract (or helpful tools) to perform the mint, and finally seeing the result on a marketplace. Along the way, you leveraged modern frameworks and standards (ERC-721, IPFS, glTF) – truly ingenious stuff – but packaged it in a creative, fun project.
Feel free to experiment further: try adding animations to your model (GLB supports that), or mint on different chains (maybe multi-chain 3D NFTs?). Each new experiment will teach you more. Being a .GBL minter means you’re not limited to flat art; you’re creating experiences. As the Eyeverse example showed, NFTs can be keys to communities and come with immersive content. You now have the power to build such experiences yourself. So go on, push the boundaries – maybe your next mint will be the centerpiece of a virtual gallery, or the avatar everyone uses in a game!
We hope you had fun on this journey. The world of 3D NFTs is evolving fast, and now you’re a part of it. Time to unleash your creativity and share your awesome 3D tokens with the world. Happy minting, and welcome to the 3D NFT club! 🎉🚀
https://discord.gg/4KeKwkqeeF
https://opensea.io/eyeofunity/galleries
https://rarible.com/eyeofunity
https://magiceden.io/u/eyeofunity
https://suno.com/@eyeofunity
https://oncyber.io/eyeofunity
https://meteyeverse.com
https://00arcade.com